
Lots of things need to be considered when planning a garden. Not only do you need to have adequate soil, water, and sun, but you have to plant things in just the right place. Some plants need lots of sun, but if you live in a very hot climate they can’t handle afternoon sun. Some plants need shade, but filtered shade, not complete shade. Some plants are just buttheads and need to be isolated or they’ll take over (I’m talking about you, mint). If you buy indeterminate tomatoes or vining cucumbers then not only do you have to consider how you will support them as they climb, but you also have to place them in an area where they won’t grow up and shade nearby plants. Basically, it’s not a simple process. But fortunately, it’s not an impossible process either.
This is my first time doing honest-to-goodness, in-the-ground vegetable growing. I can grow some killer peppers and tomatoes in containers, and my herbs have done alright over the years. But I’ve never done a vegetable garden where the plants go straight in the ground. The side-effect of being a renter for so many years, I guess. So I have to plan this all out from the beginning. Time to pull out the stuff I learned in all those botany classes.
We started with a garden plan borrowed from the back of Small Plot High Yield Gardening called the 400-Square-Foot Soup Garden. This garden plan has a great selection of vegetables for cooking, like beets, beans, broccoli, potatoes, celery, carrots, onions, etc. Originally we were going to follow this plan almost to a T, until we spoke to Dax at Beets Workin’ Farm. He basically warned us against spending much time and energy trying to grow celery and carrots. Ok, so we scratched those two things off the list. We also wanted to swap spinach out for lettuce, since we eat a lot more lettuce, and decided to do more lettuce instead of peas. Did I mention we eat a lot of lettuce? We also swapped out sorrel and parsley for lots of hot peppers. The Handyman loves hot sauce, and makes a few types of his own, so we wanted to make sure we had plenty of hot peppers to use. So, basically we kept the layout of the rows along with the herb garden in the center of the path, but the varieties we planted are quite different so we had to reassess where to place everything.
Beets, which are a family favorite, do extremely well when planted next to bush beans and potatoes but far away from pole beans. Cucumbers like being next to cabbage and broccoli. Eggplant likes peppers. Peppers like tomatoes. Tomatoes like peppers, but shouldn’t be next to potatoes, because they both attract the same pests. And pretty much everything in the garden benefits from having marigolds around. Marigolds repel pests, and the chickens can eat the spent blossoms to enrich the color of their egg yolks.
So, after a lot of drawing, erasing, re-drawing, crumpling, muttering, and grumbling, I finally came up with a layout that will keep things apart that need to be apart, keep things near that like to be near, keep things east that grow quite tall, and protect things that are more sensitive. My lettuce is currently set to get strong afternoon sun, but I am planning on making shade cloth tents for those three rows, so hopefully I can still grow it there.
And then we planted everything! That was the best part. I love sinking my hands in the soil.


It was Mother’s Day this past weekend, and my kids knew exactly what to make for me. Garden markers! The Handyman cut them some pieces of wood, and my oldest daughter helped orchestrate a painting party for everyone to make some signs. I love homemade things, and I especially love mis-matchy things. If things look too neat and orderly I start to get a little claustrophobic. I like an eclectic look. These lovely signs are a perfect addition to our garden and a great visual representation of the unique personalities each of my kids have.


In addition to the things we started from seed, we purchased the following seedlings from our local nursery:
- hot peppers
- bell peppers
- cucumbers
- zucchini
- eggplant
- purple cabbage
- lettuce
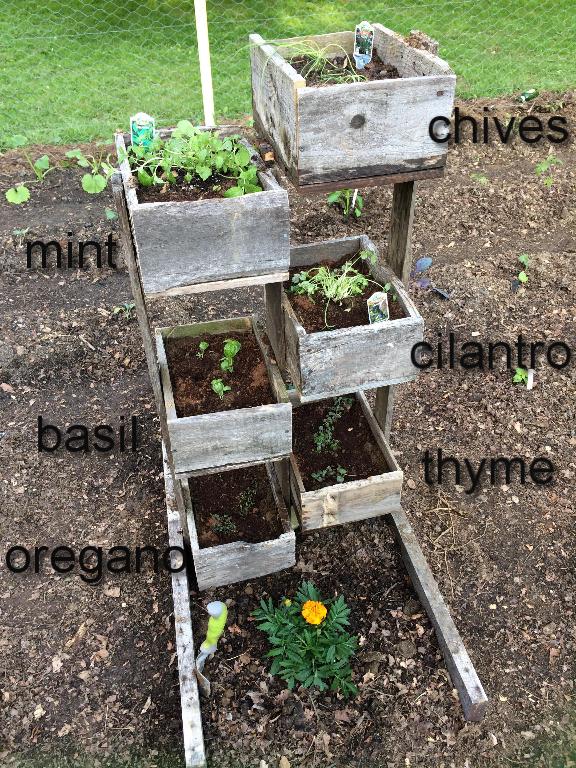
- mint
- chives
The reason we purchased some things instead of growing them was purely a financial decision. We knew we wanted a lot of variety in our hot peppers, so to buy 6-7 different seed packets only to grow 1-2 plants of each variety just doesn’t make sense. We also knew we only wanted one or two zucchini and eggplant plants. When seed packets are a few dollars a piece, and your local nursery sells seedlings at 50 cents a piece, the math isn’t difficult to do. I also ended up buying two purple cabbage seedlings on impulse, because I remembered how much I love the spicy addition to my salads. Finally, my mint and chive seeds never germinated. Still not sure why.
One thing I was trying to avoid, too, by buying some things and starting others, was having everything ready for harvest at the exact same time. The bush beans, for example, all ripen together. So if I plant 15 bean seedlings in my garden at the same time then I will have ten thousand beans at once. However, bean seeds only have about a 70% germination rate, and a germination period of about 10-14 days. So, I plant my seeds, two weeks later I plant more where the bald spots are, and now I have naturally staggered bean plants. Same with the lettuce. I bought green leaf lettuce that can be harvested in bits or the whole head. As it matures, I will take outer leaves from some of the heads, allowing the inner leaves to keep growing and growing, and some I will head completely. Then I will replace those heads with lettuce seeds and start the process over again. This will also keep us from getting bored by letting us swap out lettuce varieties throughout the season. Haha … letting us … let us … lettuce. (Ok, I’m getting giddy, time for bed).
Here it is! The finished garden! (Well, technically the potatoes weren’t planted at the time this picture was taken, but close enough!)


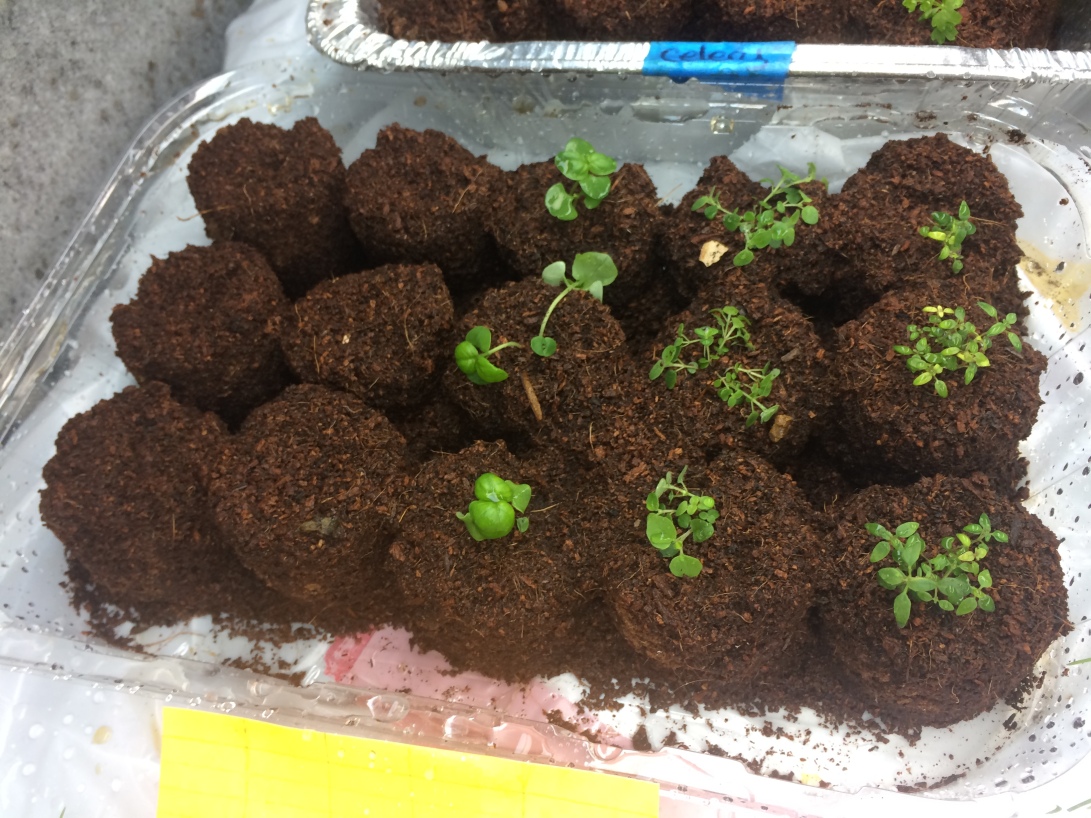
A few things we learned through the seed-starting process will hopefully help us next year. First of all, we believe we need an additional grow light in the basement. We didn’t have anything get leggy or lean, but we do feel like we could have had a better arrangement downstairs if we had more light. I also didn’t thin my seedlings. It made me quite nervous to decide which seedling was going to live and which would become chicken food, and I was worried I would pick the wrong one. Then I had this wacky idea that I could just separate the seedlings right before planting and have double the plants. Well, that was stupid and I know that now. I was only successful in separating one of my seedling sets. The rest ended up getting thinned out anyway, only the plants were bigger so I felt even worse. Next year I will thin! I promise!
Another thing that will hopefully be different next year is the starting time. We were starting from scratch this year, and we had to wait for the ground to thaw enough for us to work the soil before we could do anything. Even the silage tarp couldn’t go on until we were able to take off the first layer of grass. Next year we can put cold-tolerant plants out much earlier than we could this year, because the garden will be ready. Also, we can plant garlic this fall and have garlic in the garden next spring! Lots of things can be started earlier. The Handyman wants to build us a cold frame, too, so hopefully we can extend our growing season in both directions. I am going to spend this winter doing the research to figure out how best to get two harvests out of this garden next year.


